
It’s a perennial question for stamp collectors: What do you do with all your extra stamps?
I enjoy the meditative action of sorting through kiloware with an audiobook playing in the other room. But I’m not a worldwide collector. So, what can I do with all my extra stamps? For now, they are all neatly organized in glassine envelopes and filed in boxes. On occasion, I trade some with fellow collectors in the Asheville Stamp Club. Or I share some with my Postcrossing friends.
Every now and then, I write blog posts about what I have found.
But that still leaves thousands of stamps I “don’t need”. And many of these are mid-century definitives that you could literally buy by the bundle. It’s a shame to let them sit around unappreciated.
A little while ago, I began experimenting with framing stamps. Each postage stamp is a tiny little canvas with a hand carved or graphic art design, after all! And then I began sharing these frames with friends.
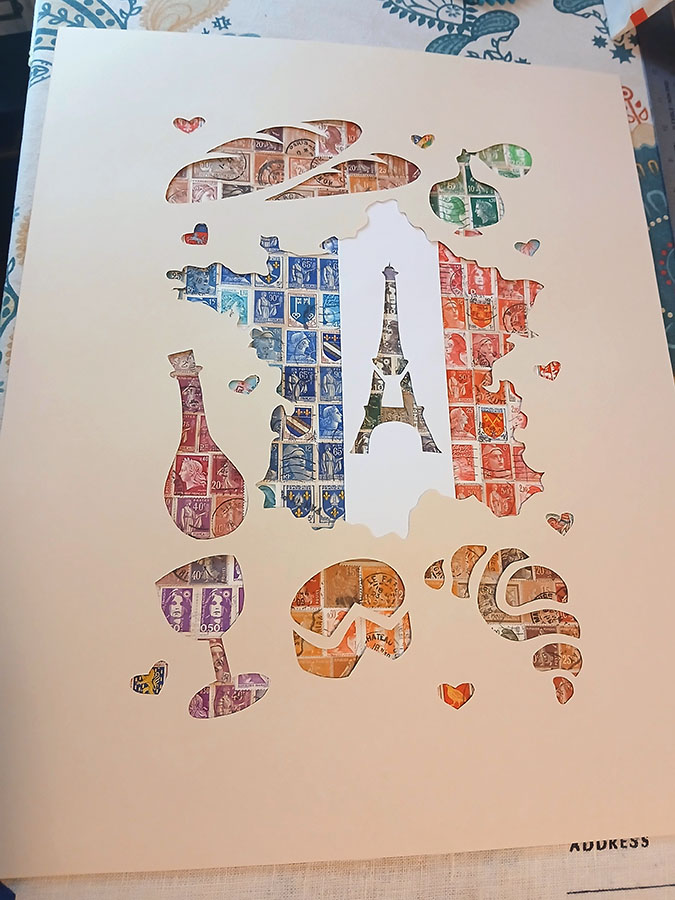
My latest and largest project to date is a birthday gift for a dear work friend. She is a devoted Francophile and frequent visitor on French soil. I was very excited with how the project turned out, so I thought I would share my creation process here.

STEP 1: Creating a concept template
I knew the dimensions I wanted to work within for this project, so I created a rough draft of the design elements on used packing paper. When I was generally happy with the shapes, sizes, and layout, I cut out the shapes from the packing paper template.

STEP 2: Transferring the template to art paper
Once I had my template created, I transferred the shapes to the back side of a fine art quality sheet of heavy paper. I made sure to buy only acid-free, archival quality materials for the project. I also used the template to create rough shape outlines on a bottom sheet of art paper. These shapes would be covered by the stamps. Then, I cut out the shapes from the top sheet with an X-acto knife.

STEP 3: Adding a third, middle layer
I wanted the map of France that makes up the centerpiece of the project to depict the colors of the French flag. But I also didn’t want too much white space because of the white stripe. I decided to use a strip of white art paper for the stripe, but create a cutout of the Eiffel Tower. I affixed it to the top sheet using archival quality tape.
STEP 4: Laying out the stamps
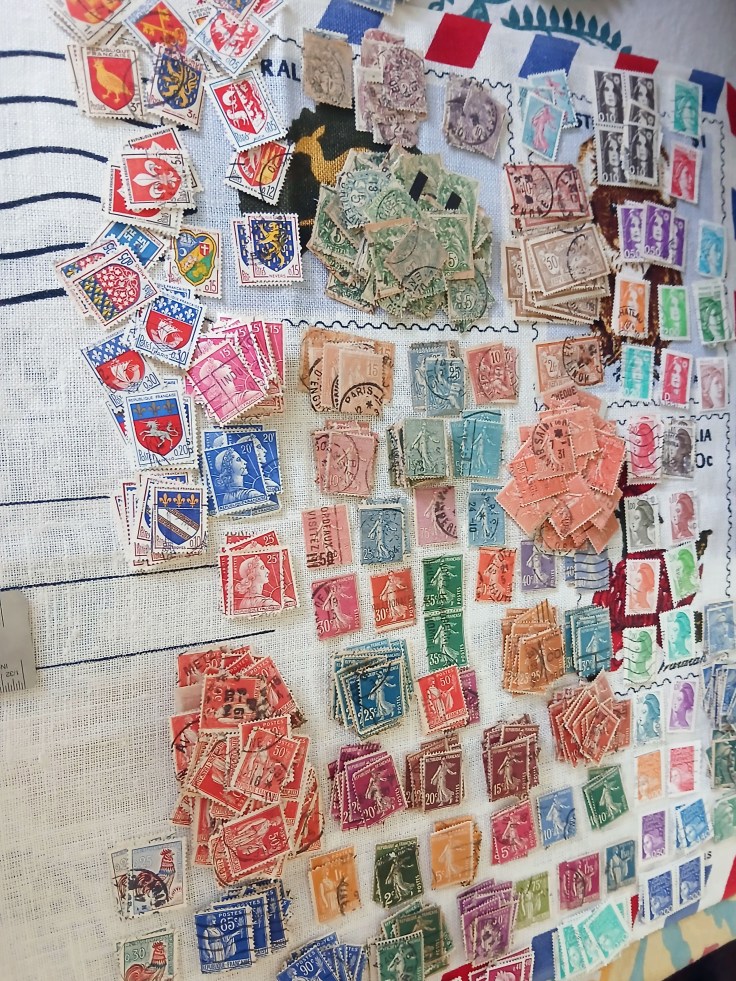
I decided that for this project I would stick with definitive stamps. They are mostly the same size, and their colors really pop compared to some of the softer French commemoratives. First, I went through my French definitive stamps and pulled out the “extras”. (I saved a couple of each denomination in case I do decide to actively collect France in the future.) Those extras are what you see here. I hinged the stamps onto the back sheet using stamp hinges. That way, if someone wants to salvage the stamps in the future, they can do so.
STEP 5: Final touches
After I affixed as many stamps as I thought I needed onto the back sheet, I overlaid the top sheet, checked for holes, and filled them in. When I was happy with the result, I taped the back sheet to the top sheet so that they would stay aligned in the frame.

STEP 6: Framing a final piece of stamp art!
The last step was to put everything in a frame. I used a salvaged frame and mat boards that were in good shape. I’m relatively familiar with framing art—my mom ran a gallery when I was a kid and I would help her cut the glass—but I’m certainly not a professional. However, I did my best to make the project look nice in the frame. I think as long as no one peeks too closely behind the curtain, it will be a fine piece for my friend’s newly created home gallery wall!
What do you think? Have you tried creative ways to repurpose your “unwanted” stamps? Would you hang stamp art in your home? Let me know your thoughts!

Leave a comment